Read Part 1: Aperture & ISO Here
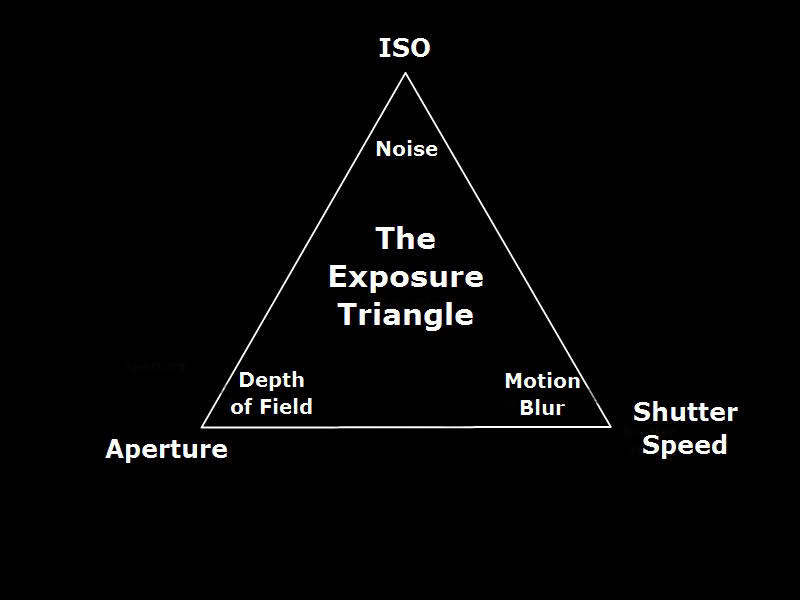
Last time we looked at the first 2 prongs of the exposure triangle, Aperture and ISO. This week we’re going to tie it all together and talk about the last point, Shutter Speed and how everything relates to each other. Before you go any further, I suggest you read the first part in the link above lest you be confused. Again, this series of guides is for the absolute beginner and if you know all of these already, share the link with someone who doesn’t! =)
Shutter Speed
The third point to the Exposure Triangle is a thing we call shutter speed. Shutter speed is measured in seconds, going anywhere from 1/8000ths of a second to a full 30 seconds. Shutter speed is the indication of how long the camera shutter opens and exposes the sensor to light. Shutter speed can be compared to a pair of curtains on a window. The shutter speed is an indication of how long the curtains stay open before they shut again. Granted it would be hard to open the curtains for only 1/500ths of a second, but you get the idea.
Article Continues After The Jump!

With this in mind, the faster the shutter speed, the LESS light you let hit the sensor. The slower the shutter speed, the more light you let in. How this impacts your photos is that at a quicker shutter speed, you will be prone to freeze subjects mid movement. At a quick enough shutter speed, you will even freeze movement of water and such. At a longer shutter speed, you will get a lovely motion blur, light streaks, or even smooth over flowing water.

The down side to having a very long shutter speed is that you’re very susceptible to hand-held motion blur, whereby the entire picture is blurry. Usually for very long shutter speeds, you’ll want to have a tripod, or solid surface to rest your camera on.
Tying it all together
Now that you know the points of the exposure triangle, hopefully you can see how they all relate to each other. To achieve a properly exposed photo, there are particular values for each of the points that will get you there. For this purpose, we will use the values of ISO 400, f/5.6 and 1/125s for ISO, Aperture and Shutter Speed respectively. Usually on a digital camera, you will keep 1-2 of the values fixed and adjust your third to give a perfect exposure.

For example, with the values above, we keep the ISO at 400, but we want a shallower depth of field, we have learned that to achieve that, we have to reduce the Aperture to a lower value like say, 2.8. If we just adjust the aperture, and not the shutter speed, we will be letting more light in and will make the photo too bright. To compensate for this, we need to increase the shutter speed to around about 1/250 to 1/320 while keeping the ISO constant.

What if we wanted to freeze motion on the same scene? We start off at the same values of ISO 400, f/5.6 and 1/125, but 1/125s is not fast enough to totally freeze a scene. We need to up the shutter speed to about 1/500. However, since the shutter won’t be open so long the scene will be darker than what the perfect exposure is. To get back to the right exposure, you guessed it, you have to adjust either one or both of the values for ISO and Aperture. Since I don’t want too shallow a depth of field, I’ll say adjust the ISO to around 1600. At the values of 1/500s, ISO 1600 and f5.6, your noise is higher, but you’ll get the frozen motion you need.

The last example is if you want a nice long exposure shot of a scene to produce amazing light trails and great motion blur for your moving components. We want to slow the shutter speed all the way down to about 1s or more, increase the aperture to f/22 or something and push down the ISO to 50 or so.
With these 3 examples I hope you are starting to see how the exposure triangle works. If a more abstract example is what you need, think about it as a garden hose filling a pail. The amount of water needed to fill the pail is the perfect exposure. The Aperture will be the diameter of the hose, the shutter speed will be the duration the hose is left on and the ISO will be the water pressure of the hose. To fill the bucket, you can adjust any of these variables to get the same end value, but at least one has to remain constant.
I hope after this 2 parter you have a deeper understanding of exposure and how you manipulate the key variables on your camera to achieve them. Stay tuned next week for the last (kind of optional) part to cover interpreting these and using the various priority modes on your camera.
If you have any questions, do drop us a comment or a message on Facebook. As always you can get me at @luc_sohow. What do you want to see on the Wednesday Photography section?
Follow us on Instagram, Facebook, Twitter or Telegram for more updates and breaking news.


